|
Wheels
- What Size
People
email me all the time, asking what size wheels will go on their
Punto, so here it is;
15" - No problems at all
16" x 7" with 195/45/16 will be fine, even when lowered.
16" x 7" with 205/40/16 will catch on the arches slightly.
16" x 7.5" with 195/45/16 will be ok even when lowered,
except with people in the back, but even then it's only really
light scrubbing on bumper mount and will not damage tyres.
17" x 7" and 17" x 7.5" will require modifications
to the bumper, and possibly the wheel arch too, with a certain
tyre size, you may get away with no modifications and slight rubbing,
but do not buy 17's expecting them to go straight on. One tyre
manufacturer / size which has worked with no mods are Avon ZZ1
205/40/17.
I
have got 16" x 7.5" with 195/45/16 Avon ZV1 tyres, and
I'm very happy with it, and it only rubs with 4 people in(+ICE)
over big bumps.
Gearknob
Removal
To
add an aftermarket shiney knob to your punto involves getting
out the trusty hacksaw or stanley knife and hacking the standard
one off.
Starting at the bottom of the plastic gearknob, make a slit all
the way to the top and over the centre of the top part, then use
a flatblade screwdriver to lever it off.
For extra looks, you can chop off an extra inch or so to give
it the short shift feel.
Handbrake
lever Removal
This
one also involves taking a stanley knife and making a slit from
one end to the other, be careful as you prize off the old one
as there is a spring mechanism holding the button in place.
D-Badging
When
you remove the badges from the front and rear of the punto, you
will notice 3 gaping holes on the front and 2 on the back.
To get rid of these you need to be a dab hand at both fillering
and spraying, as the bonnet has to be blown in or completely re-sprayed.
Might be best to get the experts in!!
MAGNEX
Twin centre exit
Loads
of people email about exhausts asking mainly where I got mine
from, so I thought I'd save myself tying it out again by putting
the details here..
The exhaust on my car
is the Magnex Twin centre exit which is available for the GT.
Fitting involved modifying the sporting bore size to the size
of the GT to make the two mate.
To do this you need a funnel shaped piece of pipe, an angle grinder
and a welder.
If you want a pro job done, give Well
Lane Turbo centre a buzz
If you fancy getting jiggy under the car yourself, it's a simple
job, and if you think you can attempt it yourself, it's obvious
what you need to do, so I'm not going to explain it!
Gettin the exhaust to exit in the centre involves removing the
water drainer from the spare wheel well, and replacing it with
a bracket which hangs down in the centre and has 2 hanging point
for the exhaust rubbers, it's very well designed and why fiat
didn't do it theirselves I'll never know!!
Air
Filter Fitting
These
instructions were written for the 1600 Engine K&N 57i, but
I assume they will be similar for all makes.
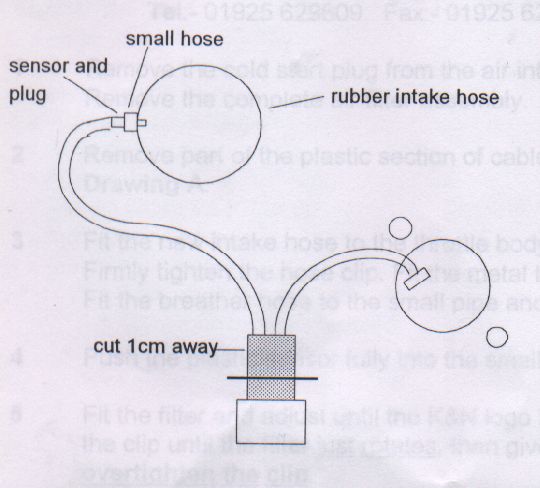
1. Remove the cold start plug from the air intake system. Remove
the black plastic sensor. Remove the complete air filter assembly.
2. Remove part of the plastic section of cable cover to increase
the length of the two wires. DRAWING
A
3. Fit the new intake hose to the throttle body using
the cut-out to locate on the throttle body. Firmly tighten the
hose clip. Fit the metal tube with the small pipe to the new intake
hose. Fit the breather hose to the small pipe and clip in place.
DRAWING B
4. Push the plastic sensor fully into the small hose and replacet
he plug. DRAWING A
5. Fit the filter and adjust until the K&N logo is straight
before tightening in place. Tighten the clip until the filter
just rotates then give one full turn (360 degrees).
DO NOT OVERTIGHTEN.
6. COLD AIR SYSTEM.
Fit the bracket to the hole in the front panel. DRAWING
C
7. Carefully expand the flexi cold air hose to approximately
90cm/36". Cut out sections of the front grille to allow cold
air to enter the hose. DRAWING
D
8. Feed the cold air hose down past the battery under the
slam panel and towardst he front grille. Pierce a small hole in
the plastic screen and also in the air hose. Attach the hose to
the screen with the small plastic tie. DRAWING
D
9. Feed the cold air hose around the radiator expansion tank
(black top) and attach it to the tank with long plastic tie. Position
the cold air hose to finish appx 10cm from the filter (no nearer),
and secure the end of the hose to the new bracket. DRAWING
C
Under normal conditions clean and re-oil the filter at appx 40,000
miles.
|
